
A strong image starts with a clear brief. This Hy Image 3.5 guide walks through three creative workflows: a poster with exact headline text, a product photo in a new setting, and a character carried across different scenes.
For each workflow, decide what you want to create, what must stay unchanged, and how you will check the result. Use the copyable prompts below as a starting point, then adapt the subject, composition and lighting to your project.
| Workflow | Starting point | What to check |
|---|---|---|
| Text to image | A brief with subject, layout and lighting | Headline accuracy and visual hierarchy |
| Reference edit | A product or portrait image | Shape, materials, colors and edges |
| Iterative refinement | An image you want to develop | Consistent identity and the requested change |
Build a brief that is easy to refine
Name the deliverable. A poster needs room for a headline. A product photograph needs a clear subject and convincing light. A character scene needs recognizable identity details.
Separate fixed details from changes. For an edit, list the parts that must stay the same before describing the new background or lighting. This gives you a concrete checklist when comparing the result with your reference.
Choose the layout early. Decide whether the image belongs in a square product card, a vertical poster or a wide scene. Set the aspect ratio in the workspace before you spend time refining small details.
Change one variable per iteration. Reuse a result as a reference, request one adjustment and compare versions at full size. A focused edit is easier to evaluate than a prompt that changes the subject, setting and style together.
Three Hy Image 3.5 workflows with copyable prompts
Each case below has a goal, the input it expects, a full prompt, and the one failure most likely to cost you a run.
1. Text-rich event poster
Goal: produce a poster where the headline, date, and location are readable at a glance. Text rendering is the task most people use to judge a Hunyuan image model.
Input: none. Text-to-image.
Create a vertical event poster for a trail race. Exact headline in large condensed capitals: "FIRST LIGHT RUN". Below it, smaller: "5 OCT · DESERT RIDGE · 6 AM". A small runner silhouette on a ridge at sunrise, warm crimson and sand palette, clean grid, generous empty space, no other words, no logos, no watermark.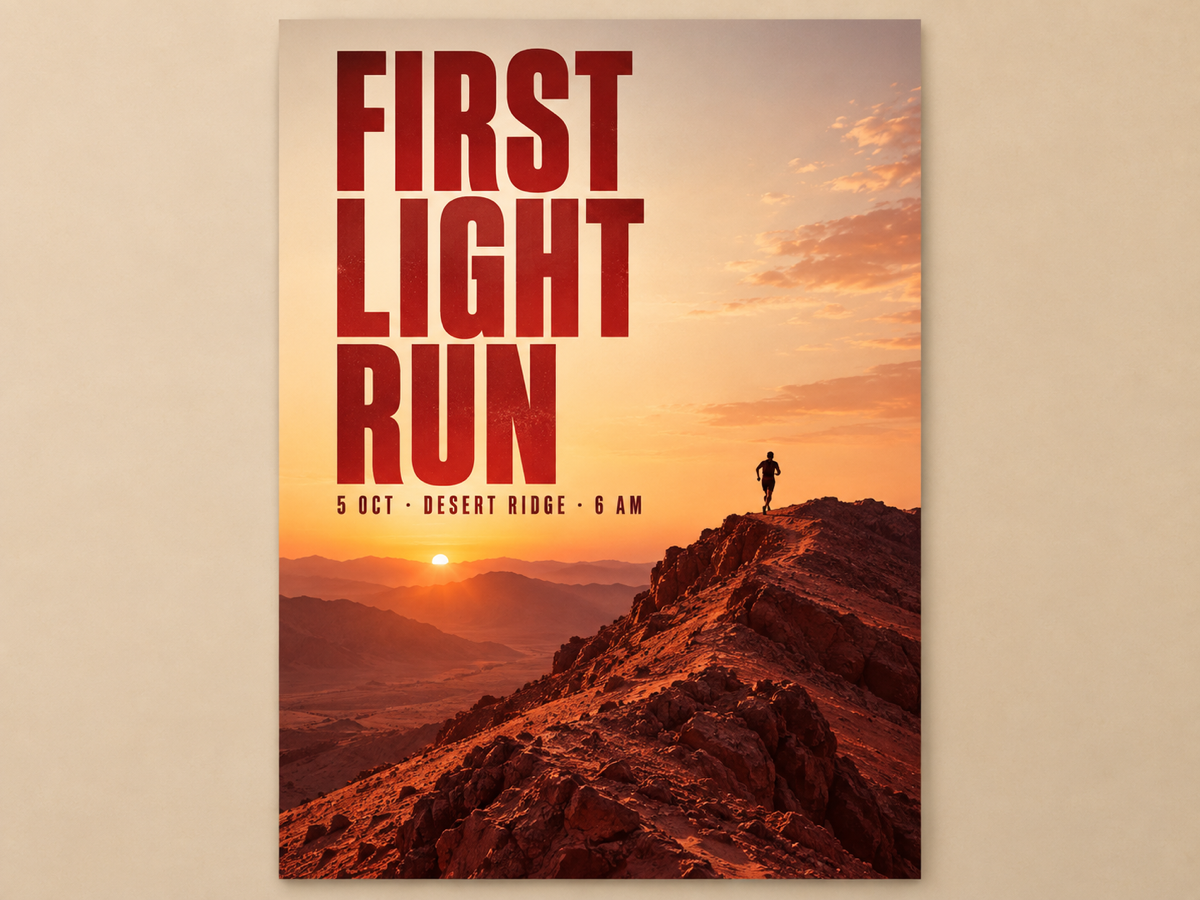
What to watch: long secondary lines break first. If the date or place comes back garbled, shorten each line to a few words and ask for a larger type size. Check the result at full size and keep the required text short enough to proof character by character. When you want to iterate on wording quickly, create an AI poster in the browser first and lock the copy.
2. Product scene edit
Goal: keep a product exactly as photographed and change only its surroundings. This is the reference-edit path, not a redesign.
Input: one studio product photo on a plain background.
Keep the uploaded running shoe exactly as it is: same shape, proportions, mesh, sole, laces, color, and stitching. Place it on a wet basalt rock above a mountain lake at sunrise, add drifting mist and a soft contact shadow, keep the shoe sharp and the background slightly out of focus. Photorealistic product campaign photograph, 4:5. Do not redraw the product, do not add logos or text.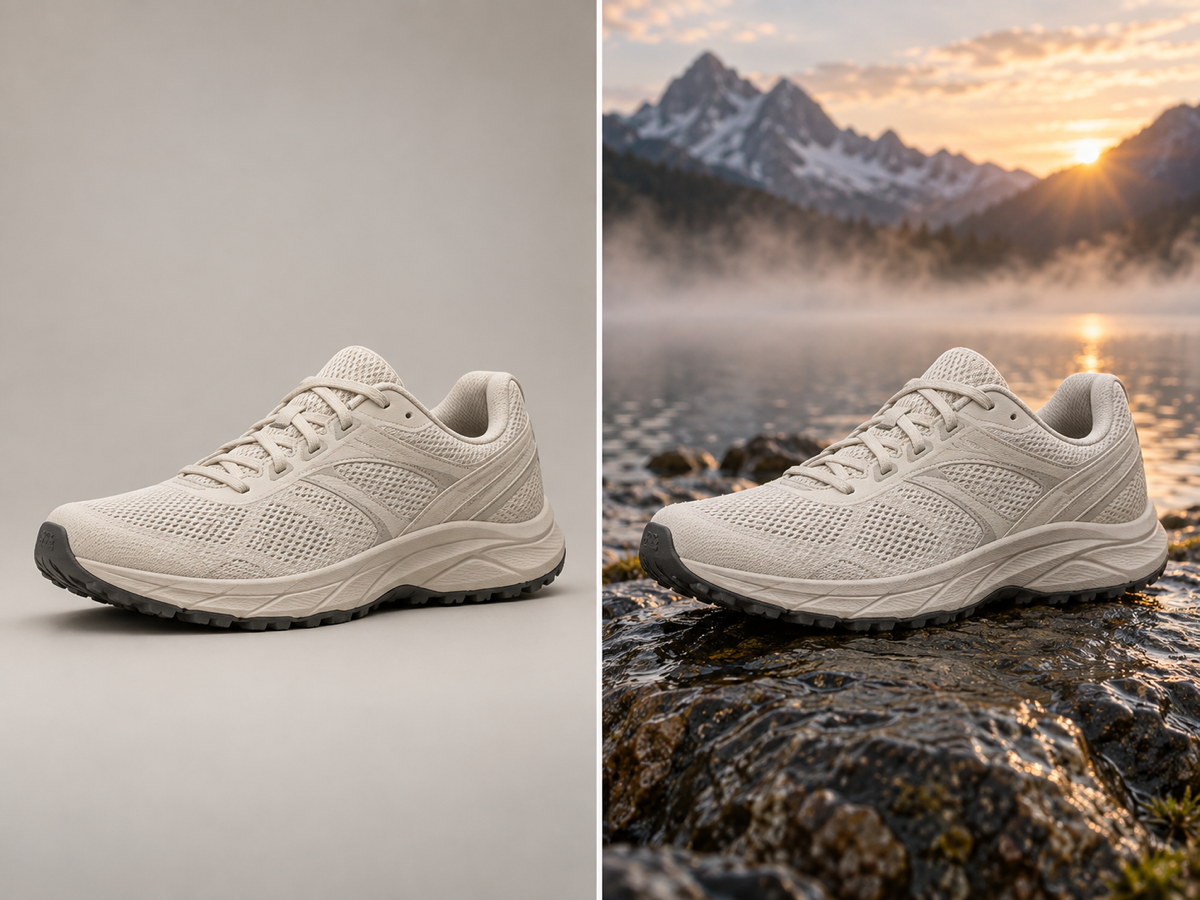
What to watch: editing models often "improve" a product while they move it. List the parts that must not change, then compare input and output side by side at full size. If the product drifts, describe only the new environment and drop any wording that could be read as a redesign. You can rehearse the same before-and-after on your own catalog image with AI product photography.
3. Character consistency across turns
Goal: keep one fictional subject recognizable after the scene changes. Keep a short list of identity details to check in every scene.
Input: none, or one approved reference image of a fictional character.
Shot one: a fictional courier in a rain-soaked neon alley at night, olive field jacket, short dark hair, a small scar above the left eyebrow, cinematic still, shallow depth of field. Shot two: the same character, same face, same jacket and scar, now at a sunlit desert bus stop, matching identity and proportions. No text, no logos.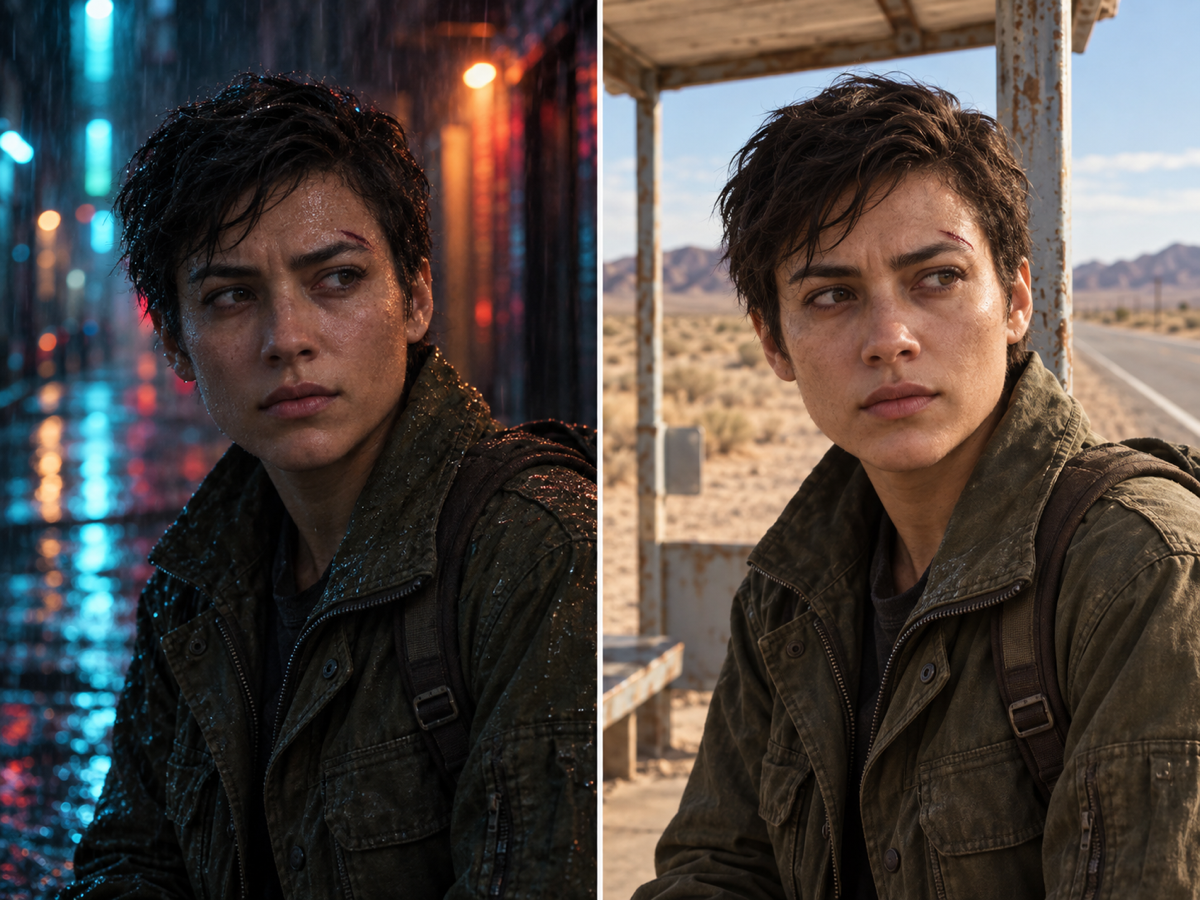
What to watch: across turns, identity details quietly drift. Give the model a short invariant list — jacket, hair, scar — and change only one variable per turn. Reuse an approved image as a reference and compare the first and last image at full size. If a detail disappears, restate it at the top of the next message rather than rewriting the whole prompt. The same prompt-led edits work in the Img ai image editor.
Put the prompts to work
Open the Hy Image 3.5 workspace and choose Use this brief on a case card to load its prompt. The product-edit brief switches to Edit so you can add your own reference image.
- Write one brief with a subject, a scene, one light direction, and the parts that must stay unchanged.
- Put any exact words in quotation marks and keep them short.
- Choose Generate for a new picture or Edit for an existing image.
- Select the aspect ratio and resolution for your final placement.
- Inspect text, edges and identity at full size. Use Edit this image to refine a result with one change at a time.
- Download the version you accept and keep its prompt next to the file.
Which workflow fits you
- Text-led posters and infographics. Start from a text brief when the deliverable is a layout with a short, exact headline. Proof every character before publishing.
- Product and scene edits. Use reference input when the product must survive the edit. Name the invariants and compare against the source.
- Character and style continuity. Reuse a reference when a subject has to stay recognizable across several shots, and restate the fixed details in each edit.
- Fast browser iteration. Load a brief, compare results and continue from the version closest to your goal.
FAQ
What should a text-to-image prompt include? Name the subject, setting, lighting and layout. For a poster, put the exact headline in quotation marks and describe its size and position. Avoid adding unrelated instructions that compete with the main idea.
How do I preserve a product during an edit? Upload a clear reference and list the details that must remain: shape, proportions, color, materials and any visible markings. Describe the new surroundings separately, then compare the result against the original at full size.
How do I choose the image size? Match the aspect ratio to the final placement and select a resolution in the workspace. Check small text and fine edges in the downloaded image before using it in a campaign.
How can I keep a character consistent? Use an approved image as a reference and repeat a short list of fixed details such as face, hair and clothing. Change one scene element at a time and check the character against the reference after each edit.
Can I continue editing a result? Choose Edit this image to use the result as a reference. Explain the next change and keep the details you want to preserve explicit in your prompt.
Start creating from a clear brief
Open the Hy Image 3.5 workspace, load one of the briefs above and adapt it to your own project. Start with the overall composition, check the details at full size and keep refining until the image fits the intended placement.