
Text and reference input
Describe a new scene with a text prompt, or upload a reference image and explain the changes you want.
Creative workflows · Generate + Edit
Explore Hy Image 3.5 workflows for posters, product scenes and consistent characters. Start with a clear brief, use reference images to guide an edit, and refine the details one step at a time.
Image studio
GPT Image 2.5Choose Flare for quick iterations, or Sunburst when finer detail matters.
From brief to finished visual
Keep the parts that work.
Create a first version, choose Edit this image, then describe one change. Describe what to preserve and what to replace.
This Hy Image 3.5 guide focuses on three creative tasks: building a poster from a brief, restaging a product from a reference and keeping a character recognizable across scenes. Describe what you want to create, name the details to preserve and refine the background, lighting or composition step by step.
Read the official Tencent Cloud guide
Turn a brief into a visual, restage a reference image and keep refining the details that matter to your project.
Describe a new scene with a text prompt, or upload a reference image and explain the changes you want.
Refine an image across several turns. Keep the details you like and adjust the subject, background or lighting one step at a time.
Shape a short idea into a clear brief with a subject, lighting, composition and the details that must stay unchanged.
Choose a portrait layout for a poster, a square for a product card or a wide frame for a scene, then set the output resolution in the workspace.
Each card names the goal, the mode and the parts a reviewer should check. Choose Use this brief to load the prompt into the workspace above.
Case 01 · Text to image
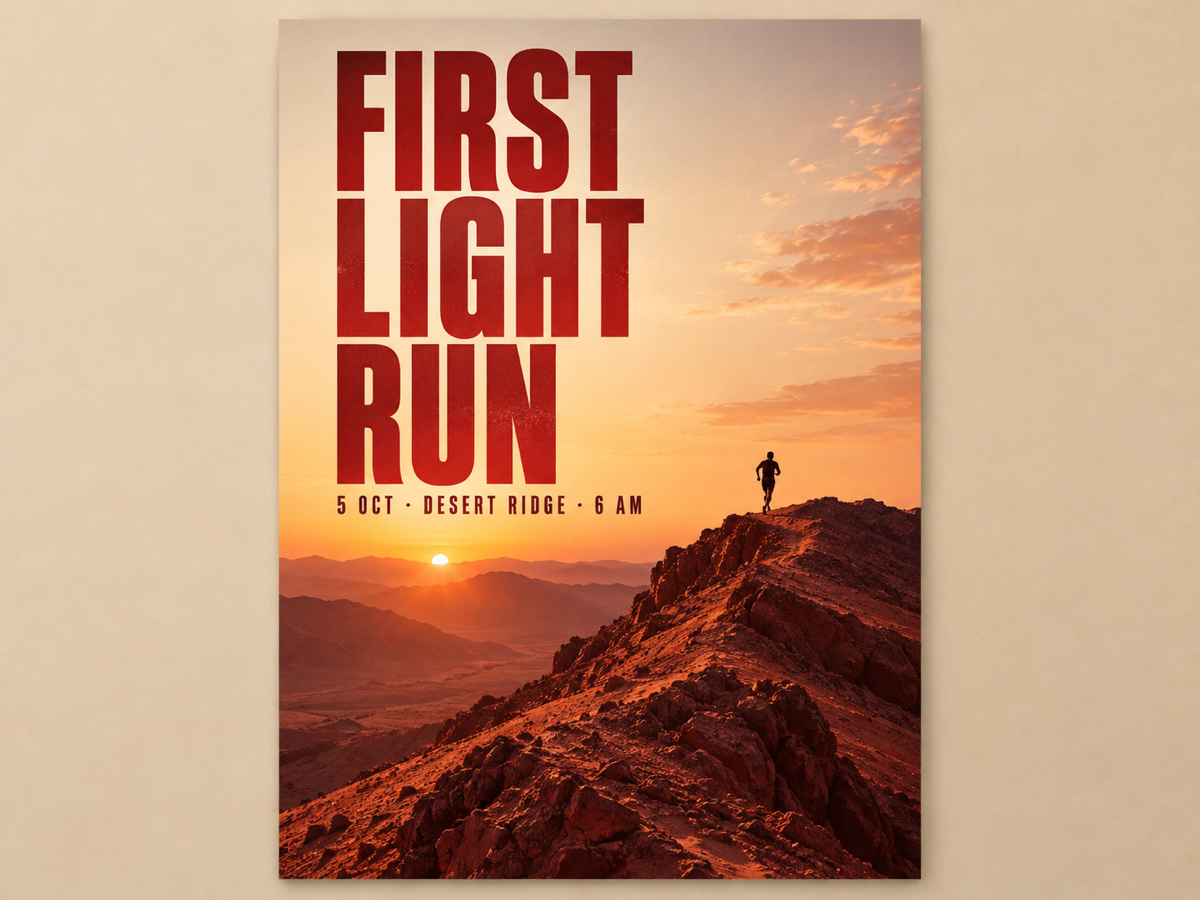
Give the model the exact words in quotation marks, state the hierarchy, then keep every other instruction visual. Text-led posters are a good way to judge how a prompt handles short, high-contrast lines.
Create a vertical event poster for a trail race. Exact headline in large condensed capitals: "FIRST LIGHT RUN". Below it, smaller: "5 OCT · DESERT RIDGE · 6 AM". A small runner silhouette on a ridge at sunrise, warm crimson and sand palette, clean grid, generous empty space, no other words, no logos, no watermark.

Case 02 · Reference edit
Upload one product photo first, then name the parts that must not change. For a running shoe, keep its shape, mesh, sole and laces while the scene changes. Compare the upload with the result at full size before publishing.
Keep the uploaded running shoe exactly as it is: same shape, proportions, mesh, sole, laces, color and stitching. Place it on a wet basalt rock above a mountain lake at sunrise, add drifting mist and a soft contact shadow, keep the shoe sharp and the background slightly out of focus. Photorealistic product campaign photograph, 4:5. Do not redraw the product, do not add logos or text.

Case 03 · Multi-turn consistency
Keep the character recognizable as the scene changes. Name the face, hair and clothing that must stay consistent, change one detail per turn, and reuse the previous result as a reference.
Shot one: a fictional courier in a rain-soaked neon alley at night, olive field jacket, short dark hair, a small scar above the left eyebrow, cinematic still, shallow depth of field. Shot two: the same character, same face, same jacket and scar, now at a sunlit desert bus stop, matching identity and proportions. No text, no logos.
Name the subject, the scene, the lighting and the deliverable. Put exact text in quotation marks and list the parts that must stay unchanged.
Use Generate for a new visual. Switch to Edit when you want to restage an uploaded product, room or portrait while keeping its details.
Choose an aspect ratio and resolution for the final placement, from a square product card to a vertical poster.
Compare the result with the source, zoom into text and edges, then use Edit this image to feed the finished image into the next brief.
Want a deeper walkthrough with three full cases, failure points and copyable prompts? Read Hy Image 3.5: prompts and image editing workflows.
Start from the material you have and choose the workflow that fits your deliverable. Each approach needs a different kind of brief.
| Decision | Text to image | Reference edit | Iterative refinement |
|---|---|---|---|
| Starting point | A written brief | An uploaded reference image | A result you want to refine |
| Best suited to | Posters, concepts and new scenes | Product restaging and background changes | Character continuity and small corrections |
| Prompt focus | Subject, composition, lighting and exact text | What to preserve and what to replace | One change at a time with a reference |
| Review before download | Text accuracy and overall layout | Product shape, materials and edges | Face, clothing and other consistent details |
Start with a text brief when you need a poster, a concept or a scene without an existing image.
Upload a product or portrait when the subject must remain recognizable while its surroundings change.
Reuse a result as a reference and change one detail at a time, checking each version before downloading.
Choose Generate or Edit in the workspace, then set the aspect ratio and resolution for your image.
Edit this image sends a finished result back in as a reference so you can keep iterating without a separate upload step.
Download a finished image or return after a refresh to check your saved task.
Explore text-to-image briefs, reference-based edits and iterative refinement for posters, product scenes and consistent characters. Each case includes a prompt and the details to check in the result.
Name the subject, setting, lighting and layout. Put exact headline text in quotation marks and specify its position. Keep the brief focused on one deliverable.
Select Edit, upload a reference image and describe the change. List the details that must stay unchanged, such as product shape, color, materials or facial features.
Choose the aspect ratio for your placement, then select a resolution in the workspace. Inspect the downloaded result at full size, especially small text and fine edges.
Reuse an approved image as a reference. Keep a short list of fixed details such as face, hair and clothing, and change only the setting or one other detail per edit.
Choose Edit this image to load a finished result as a reference. Describe the next change and keep the parts you want to preserve explicit in the prompt.
Read every word, inspect product edges and compare identity details against the reference. Adjust the brief and make another edit if something has drifted.
Start with one subject, one delivery format and the details that must survive. Load a brief, refine your image and download the version that fits your project.
Create an image